Network Setup
Indoor Network Setup
To ensure your robot has continuous and reliable network connection, you should use wpa_supplicant if you don’t have a display for the robot.
Here are the steps for setting up wpa_supplicant.
First of all, ask for a static ip for your robot in the mrsl network.
add
wpa_supplicant.confto/etc/wpa_supplicant/:ctrl_interface=/var/run/wpa_supplicant ctrl_interface_group=0 ap_scan=1 fast_reauth=1 network={ ssid="mrsl_airrouterhp" scan_ssid=1 key_mgmt=NONE }
modify
/etc/network/interfacesso that it looks like:auto lo iface lo inet loopback # auto start wlan0 interface auto wlan0 # use static ip for wlan0 iface wlan0 inet static # your desired ip address 192.168.129.xyz gateway 192.168.129.1 netmask 255.255.255.0 wpa-conf /etc/wpa_supplicant/wpa_supplicant.conf auto eth0 iface eth0 inet static address 192.168.1.abc netmask 255.255.255.0
The next time your power on your robot, it will automatically connect to the router you specified in
wpa_supplicant.conf. And if will reconnect even if you lose connection temporarily.A sample
interfacesfile can be found here.
Outdoor Network Setup
For large-scale outdoor experiments, we need ad reliable long-range wifi connection between the robot and the ground station. To this end, we use Ubiquiti wireless products. Both bullet M and PicoStation M are good choices.
We recommend using PicoStation simply because it is easier to strip the case off.
We use Ubiquiti products mainly for its airMax technology, which is designed for outdoors wireless communication.
Below we describe in detail how to setup airMax connection between two Ubiquiti devices. We use a Bullet M in Access Point mode to serve as a ground station and a PicoStation M in Station mode, which can be seen as a client.
Access Point (Ground Station)
On your computer, add a new
Ethernetconnection from Ubuntu Network Manager.In IPv4 Settings tab, change Method to
ManualAdd an Address, here we use
192.168.1.200, with Netmask255.255.255.0. You can leave the Gateway and DNS servers empty.Power up the Bullet M and connect to your computer via Ehternet.
Make sure you are on the network configuration you just setup. Then open a browser window with the following ip address
192.168.1.20, which is the default address for Bullet M.The default Username and Password are both
ubnt.In the first tab left to MAIN, select
Enablefor airMAX, then click Change and Apply. Notice that all the changes you made will be cancelled if you switch tab without applying those changes.In WIRELESS tab, make the following changes. The rest can be left as default.
Item Value Wireless Mode Access Point SSID ubnt (anyname) Channel Width 20 MHz (recommended) In NETWORK tab, make the following changes.
Item Value Network Mode Bridge Management IP address Static IP Address 192.168.1.20 Netmask 255.255.255.0 Gateway IP 192.168.1.1
Station (Client)
On your robot, make sure your ethernet interface (eth0) is on the same subnet as the Access Point, which should be
192.168.1.abc.Power up the PicoStation M and connect to your robot via Ethernet.
Open a browser window with the folloing IP address
192.168.1.20(default).Again, he default Username and Password are both
ubnt.In WIRELESS tab, make the folloing changes. The rest can be left as default.
Item Value Wireless Mode Station SSID ubnt (same as AP) Channel Width Auto 20/40 MHz In NETWORK tab, make the following changes. Note that IP Address should be something other than
20andabc.Item Value Network Mode Bridge Management IP address Static IP Address 192.168.1.21 Netmask 255.255.255.0 Gateway IP 192.168.1.1 In MAIN tab, remember the WLAN0 MAC of this device. Then go back to the Access Point setup page on your computer. In WIRELESS tab, select
Enablefor MAC ACL andAllowfor Policy. And add the above MAC to the list by clicking on ACL….
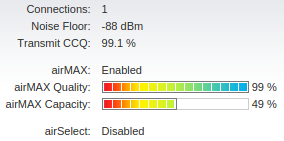
Now you should have established airMAX connection between the Bullet M and the PicoStation M. In MAIN tab of the Access Point, you will see something like this.
Internet Sharing from Your Computer
Often, it is convenient to have internet access on your robot.
Add the following two lines to your ethernet interface in
/etc/network/interfaces:gateway 192.168.1.200 # IP address of your laptop dns-nameservers 192.168.129.1 8.8.8.8 # for internet access
Put the following function in your
.bashrc, then you can enable and disable sharing viasharenet on/off:function sharenet() { if [ $# -eq 0 ]; then echo "usage: sharenet <on/off>" return 0 fi local if_from=wlan0 local if_to=eth0 # check command-line commands cmd=$1 case $cmd in on ) sudo su -c "echo 1 > /proc/sys/net/ipv4/ip_forward" echo "Enable sharing internet from $if_from to $if_to" sudo /sbin/iptables -A FORWARD -i $if_to -o $if_from -j ACCEPT sudo /sbin/iptables -A FORWARD -i $if_from -o $if_to -m state --state RELATED,ESTABLISHED -j ACCEPT sudo /sbin/iptables -t nat -A POSTROUTING -o $if_from -j MASQUERADE ;; off ) sudo su -c "echo 0 > /proc/sys/net/ipv4/ip_forward" echo "Disable sharing internet from $if_from to $if_to" ;; * ) echo "sharenet: $1: invalid command" echo "usage: sharenet <on/off>" ;; esac }